Call of Duty is one of the most played games all over the globe. But still, it has some technical fault. Some CoD gamers and Battlefield 3 players too, who are using NVIDIA graphics card have faced sporadic crashes while playing this game.They often complaints that blackops3.exe has stopped working on their Windows 10 devices.
This problem generally affects the GTX580 users as this error is directly related to the undervolted CPU cores. Moreover, this error also prevents the game from running appropriately.
Easy Hacks to Fix the ‘Black Ops 3.exe has Stopped Working’ Issue:
There are a ton of solutions to fix this error instantly. You can also perform the below hacks in their same order to get rid of this error.
Fix 1: Reinstall NVIDIA Graphics Drivers
As we mentioned earlier, NVIDIA graphics card drivers are one of the major causes behind this problem to occur. Therefore, you can try out to reinstall this to get rid of this issue.
Here’s how to do this:
- First of all, press the Win key and R simultaneously from the keyboard to open the Run Dialog box.
- Then, type “appwiz.cpl” in the Run box and press the Enter key to open the list of programs that are installed on the system.
- Search for the ‘Nvidia GeForce Experience’ option by scrolling the list of programs. Once you get that click twice on it and complete the uninstallation process by following the on-screen prompts.

Note: You can also select the ‘Additional NVIDIA applications’ to remove them from the system.
- Now, visit the official website of NVIDIA and download the ‘GeForce Experience’ from there.
- After downloading the ‘GeForce Experience’, go to the location where you have saved that and open it.
- Now, start the installation process and complete it by following the on-screen prompts.
After reinstalling ‘GeForce Experience’, you can also try to play the seconds mission of CoD to check if the issue is fixed.
Fix 2: Verify the Cache of the Game
If you are a user of Steam, then you can try to verify the cache of the game once again.

To do this, you can follow the steps mentioned below:
- In the beginning, launch the Steam app. Then, navigate to the game library.
- Afterward, right-click on the Game (BlackOps). Choose the Properties option from the list.
- Then, navigate to the Local Files tab and tap on the ‘Verify Integrity of Game Cache’ option.
After doing this, you can try to open the BlackOps once again to check if it starts to run.
Fix 3: Activate Developer Mode
According to Microsoft, there are games over there that are not compatible with Windows 10 Operating System. Hence, you can run such a game by enabling the Developer mode.

Here are the steps that you can follow to activate the developer mode of the Call of Duty.
- First and foremost, press I and Win key simultaneously from the keyboard to open the Settings option.
- Open you enter the Settings window, navigate to the ‘Update and Security’ category.
- Afterward, go to the ‘For Developers’ tab from the left pane of the screen.
- Next, check the ‘Developer Mode’ box to enable the Developer mode.
- Lastly, restart the system to apply the settings and check if the error is resolved.
Fix 4: Modify the Startup Settings of the Game
Call of Duty is a 32-bit game and if you are a user of a 64-bit Operating System, then it might be the significant reason behind this issue. But, don’t worry, there are some tricks to run the CoD on a 64-bit system.

You can do this by modifying the startup settings of the game.
To do this, take a quick glance at the steps described below:
- First, open the Windows Explorer by pressing the Win key and E both at the same time from the keyboard.
- Then, go to the address: “C:\Program File (x86)\Steam\steamapps\common\Call of Duty Black Ops.”
- Now, right-click on the ‘exe’ and choose the Properties option from the list.
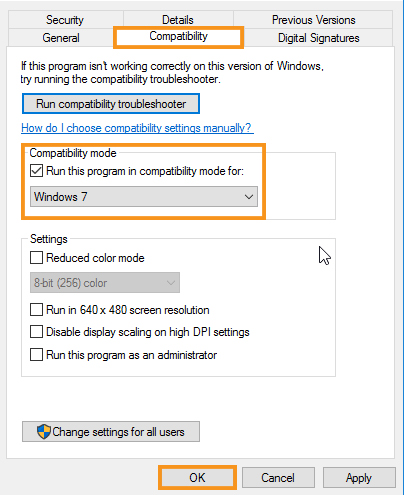
- Afterward, navigate to the Compatibility tab and then tick the box that prompts ‘Run this program in compatibility mode for.’
- Next, choose the ‘Windows 7’ option from the dropdown menu.
- Now, go back to the Settings tab. Apply the following settings and tap on the OK button.
buy zithromax online www.rehabilitace-vrsovice.cz/pear/File/tests/php/zithromax.html no prescription
- Tick the ‘Reduced color mode’ box and then set it to 16-bit.
- Check the box that prompts ‘Disable display scaling on high DPI Settings.’
- Thereafter, right-click on the Application icon and choose the ‘New’ option from the list. Then, click on the ‘Desktop Shortcut’ option.
Now, you can try to run the game once again.
Fix 5: Install DirectX End-User Runtimes
If all the above methods fail to resolve the ‘blackops3.exe has stopped working’ issue, then you can install DirectX End-User Runtimes to get rid of this issue.

How to Install DirectX End-User Runtimes?
- First of all, visit the official website of Microsoft and download the DirectX End-User Runtimes.
- Afterward, go to the folder where you have saved the DirectX End-User Runtimes.
- Open the ‘DirectX 9.0c Redistributable’ installer with the directx_Jun2010_redist.exe file.
- Perform the installation process by following the on-screen prompts.
Now, you can try to open the game to check whether the issue has been fixed or not.


