When a user encounters a Blue Screen of Death error, a system memory copy is taken by Windows and saved so that it can be used by the developers to fix BSOD crashes further.
However, they are considered to use an excess of hard drive space. Thus, in order to resolve this problem, one needs to delete the system error dump files through distinct processes.
Let’s take a brief look into system error memory dump files and some of the solutions by which you should be able to delete them.
What are System Error Memory Dump Files?
As mentioned earlier, when the system crashes or confronts a Blue Screen Death Error, it creates a copy of the system memory and saves it so that the reason behind such error can be understood. These files are then saved to the C drive. These memory dumps are called System Error Memory Dump Files.
How to Remove System Error Memory Dump Files in Windows 10?
There are numerous ways by which you should be able to get rid of System Memory Dump Files on your Windows 10 system. Let’s take a quick look at some of them.
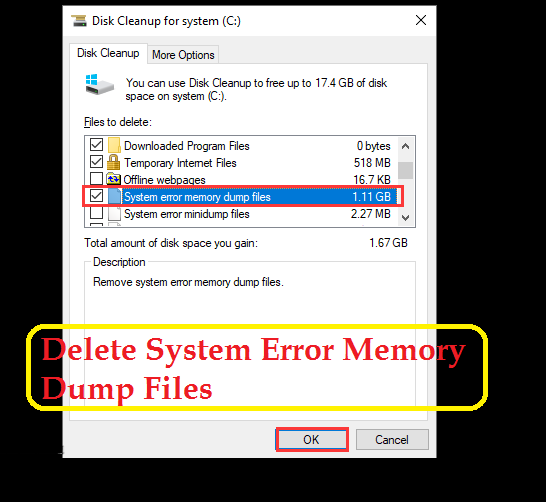
Process 1: Through Disk Cleanup
At first, you can try using cleanup to get rid of the dump files. Here are the steps by which you can run the disk cleanup.
- Press Windows and R keys to invoke the Run box.
- After that, type “cleanmgr” within it and press Ctrl, Shift, and Enter buttons. This will open the disk cleanup as an administrator.
- Choose C: drive and click on Ok. Mark the System error memory dump files box. Click the Ok button.
On an alternative note, you can launch disk cleanup through the elevated Command Prompt by following the steps given below.
- Just type ‘%SystemRoot%System32Cmd.exe /c Cleanmgr /sageset:16 & Cleanmgr /sagerun:16’ within the Command Prompt and press the Return Key.
Process 2: Through the Command Prompt
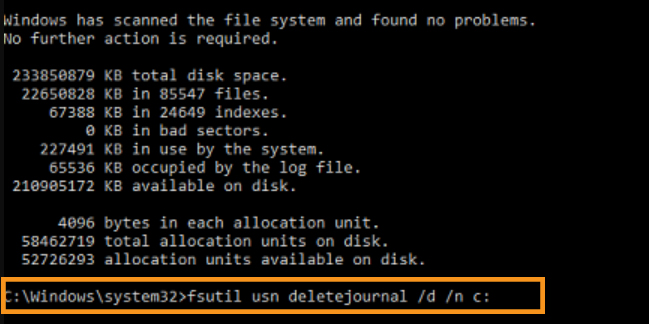
You can also remove system error memory dump files on your Windows 10 using the Command Prompt. Here are the steps involved in this process.
- Press the Windows and R keys together to start the Run box and then type cmd within it.
- Now, press the Ctrl, Shift, and Enter keys. Type the commands given below and press Enter after each line
1.fsutil usn deletejournal /d /n c:
2.del “%temp%*” /s /f /q
3.del “C:$Recycle.bin*” /s /f /q
4.del “%systemroot%temp*” /s /f /q
5.vssadmin delete shadows /for=c: /all /quiet
6.Dism /Online /Cleanup-Image /StartComponentCleanup /ResetBase
Process 3: Shut Down the Crash Dumps

A very effective solution which you can try involves turning off the crash dumps. It can be done by following the steps given below.
- Launch the Run windows by press Windows + R keys and type Control Panel within it. Press Enter.
- Again, click on Advanced System Settings to open the Advanced tab. Go to Startup and Recovery and click on Settings.
- Click on None to turn off the crash dumps and then press the Ok button.
Process 4: Disable Indexing in C Drive
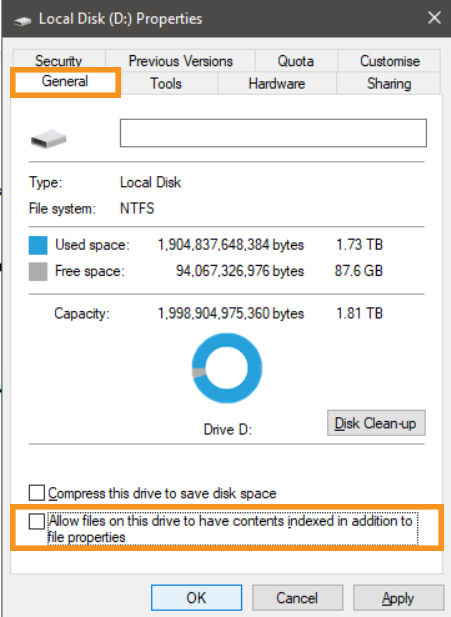
Apart from the above fixes, try disabling Indexing in Local Disk C and check if solves the problem for you. To perform this process, follow the steps given below.
- Open File Explorer and then click on “This PC. Right-click on the C drive and then choose the Properties option from the list.
- Within Properties, unmark the “Allow files on this drive to have contents indexed in addition to file properties” option and then click on Apply.
- Reboot your system and see if it resolves the problem for you or not.
So these were some of the methods using which you should be able to remove System Error Dump Files from Windows 10.


