While working on your laptop, you may encounter that the touchpad is not working properly on your device. Thus, it can hamper the work and make the overall situation very frustrating.
This issue can be caused by an outdated version of the touchpad driver. This is a common problem but, you can solve it easily on your own.
Reasons why Touchpad not Working
Below are the most common causes why the touchpad not working on your Asus or any other device:
- Disabled touchpad settings
- Corrupted touchpad driver
- An older Operating System
- Missing or corrupted system files
- Hardware problems
Now that you know what causes this trackpad issue, let’s proceed with the fixes to resolve it.
How to Fix when Asus Touchpad not Working on Windows 10?
At first, you need to reboot your computer. Sometimes, rebooting the device can solve several problems including the touchpad issue you have encountered.
If the problem still persists, then you can try other methods, which we have discussed in a detailed manner. So, go through these methods step by step until the trackpad problem is solved.
Method 1 – Enable Touchpad Settings

If the touchpad settings are disabled, then it may fail to respond properly. Therefore, you need to turn it on by following these directions:
- Press the “Windows logo” button + “R” key at the same time to launch the Run box.
- Type “main.cpl” and then press the “Enter” button or click the “OK” option.
- From the “Mouse Properties” window, go the “Device Settings” tab.
- Select the Touchpad driver/device. After that, click on the “Enable” option.
Once you are done, click on the “Apply” option followed by the “OK” button.
Method 2 – Install the Latest Version of Touchpad Driver
If you are using an older version of the Touchpad driver, it can exhibit certain issues. This is when you can see the Asus touchpad not working on your computer. So, it is important to keep the driver up to date. The following steps will help you with it:
- Right-click on the “Start” button and select the “Device Manager”.
- When you are in the “Device Manager” window, go to the “Mouse or Touch” section. Then select it to expand the section.
- Right-click on the “Touchpad driver” and select the “Update Software Driver” option.
Once the update process is finished, reboot your Asus device and then check if the issue is solved or not.
Method 3 – Turn On Touchpad from Mouse Properties

If the specific touchpad device is turned off, then you can come across this issue on your Asus laptop. So, you can enable it by following the undermentioned steps:
- Press the “Start” button and click on the “Settings” icon.
- Go to the “Devices” section and select the “Mouse & Touchpad” tab on the left panel.
- Scroll down the page until you locate the “Additional mouse” options, click on it.
- On the “Mouse Properties” window, navigate to the “Touchpad” icon as per the driver brand.
Now select the device and then click on the “Enable” option to turn on the trackpad.
Method 4 – Use the Hardware Troubleshooter

Using the hardware troubleshooter can resolve this problem on the Asus laptop. If you do not know how to do it, follow these directions cited below:
- Press the “Start button + I key” together to launch the “Settings” window.
- Thereafter, double-click on the “Update & Security” section.
- Select the “Troubleshoot” tab. Also, look for the “Hardware and Devices” section and select it.
- After that, click on the “Run the troubleshooter” option.
So, after completing the troubleshooting process, reboot your Asus laptop. Then check if the touchpad works properly without any problem.
Method 5 – Reinstall the Touchpad Driver
A corrupted driver can also lead to the issue of laptop touchpad not working. Therefore, you should remove the driver and reinstall it. Here are some steps that we have shared to do so:
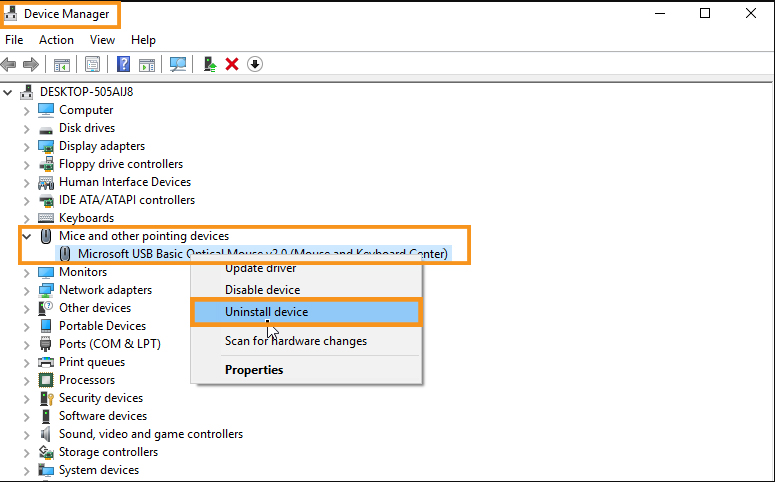
- Press the “Win + X” buttons together to launch the Quick Access menu list and choose the “Device Manager”.
- Locate the “Touchpad or Mouse” driver section on the left panel, select it and then expand it.
- Right-click on the touchpad driver and choose the “Uninstall device” option to begin the removal process.
- After removing the trackpad driver, you have to install it again. To reinstall it, open the “Device Manager” window and click on the “Scan for hardware changes” icon. Now the system will find the driver and install it automatically.
Once the installation process is done, restart the Asus computer and check if the touchpad problem still arises or not.
Method 6 – Set the Touchpad Threshold to Minimum
Another effective method in which you can get rid of this issue from your Asus laptop. Go through these steps:
- Open the “Settings” window.
- In the “Settings” window, navigate to the “Devices” section and select “Mouse and Touchpad” on the left panel.
- Locate the “Touchpad” tab from “Additional Mouse Options”. Thereafter, set the threshold slider to low/minimum level and reboot the system.
Hopefully, this is going to resolve the issue related to the touchpad delay and make the feature working.
Method 7 – Update the Operating System

If the touchpad driver is not compatible with the Operating System, you may find the touchpad is not working. Therefore, you should update the system to its latest version. So, below are the steps that you can try:
- Launch the “Settings” window and go to the “Update & Security” section.
- From the “Update & Security” window, select the “Update” tab.
- Next, click on the “Check for updates” option to check whether any updates are available or not.
- If yes, then click on the “Update” option.
Once this process is complete, the Asus laptop will automatically restart and the trackpad will start working.
Method 8 – Perform a Clean Boot

Sometimes, the third-party programs can conflict with the touchpad and this can be the problem on your Asus laptop. In order to solve this problem, you need to do a clean boot on your computer. The following steps will help with this:
- Press the “Win + R” buttons to launch the Run box.
- Type “msconfig” and then click on the “OK” option or press the “Enter” button.
- From the “System Configuration” window, move to the “Services tab”.
- Tick on the box next to the “Hide all Microsoft services” option and then click on the “Disable all” button.
After performing these steps, click on the “Apply” option followed by the “OK” button to save the changes.


